
 Sorry it has been a while since the last post. Time flys when deep in the heart of the development season, and i've been in Asia a total of 24 days during the last month and half!
In any case, heres the second to last in the Football Boot Production Series....Assembly.
Assebly is the final production process before packing and final inspection in the manufacturing of a football boot. In this step, the finished stitched/lasted upper is prepared and attached to the outsole. I know I say this for all steps, but this is as well a truely important step.
If the upper and outsole are incorrectly prepared or assembled, there can be big problem of delamination (when the outsole breaks away from the outsole) during the agressive wear that a football boot encoutners on the pitch.
More info and pics after the Read More link below.
The first step in assembly is to prepare the outsole. A special primer and cement is applied to the TPU outsole by hand. The worker must ensure that all areas are correctly covered with the right amount of cement in an even coating.

The special primer/cement is cured by UV lights to activate the glue.

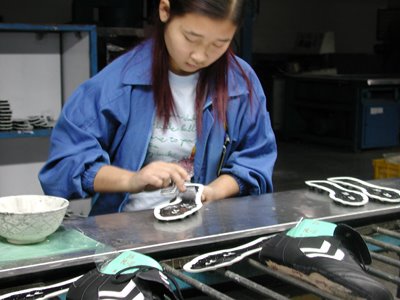
Meanwhile, the lasted upper is buffed using a small electric hand sanding type wheel, to rough the leather around on the bottom to better help allow it to be cemented to the outsole. The buffing ensures that the fibres of the leather are open and the cement penetrates enough to get good bonding.

The lasted upper is then attached to the outsole. This must be done very carefully to ensure the outsole is put on straight and inline with the upper. The toe is first attached, then the heel, the the center area is presseed into place by hand.

The cemented upper and outsole are then pressed together using a hydraulic press which applies a constant pressure for a contant time to get good bonding between the upper and outsole. To ensure even pressure is applied to the main outsole bootom, a special silicone molded form is placed under the upper (you can see it is a tan color) which has a negative shape of the outsole mold into it. Without this press pad, the pressing machine would only apply pressure to the stud tips which would warp the studs and not provie any pressure to the main outsole bottom which must bond to the upper bottom.
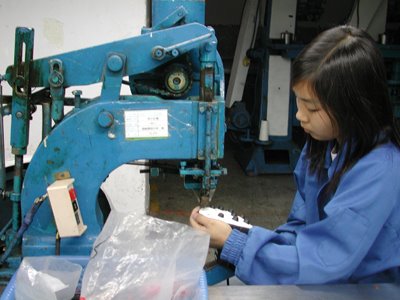
the final step is the insertion of the metal rivets in the outsole bottom. For this a rivet machine is used which is loaded like a machine gun with multiple rounds of rivets, and then activated by the operator with a foot pedal when the outsole is in place. The metal rivets go through the TPU outsole and lasting board to provide additional bonding strength to hold the outsole on.
Materials
Cutting
Printing and HF embossing
Stitching
Lasting
Assembly
final QC and packing
Labels: case study, china, design, development, factory, football, hummel, leather, materials, process, production
![]()
![]()
5 Comments:
Hi Richard,
For the fisrt step, cement is the white part that we see on the picture ? it's only applied around the outsole ? In the middle of the outsole is cement applied ?
For the rivets, i've seen on my boots that sometime there are at the toe and at the heel, or only at the toe. Is it for reduce cost ? Or a real need to reinforce the assembly ?
The rivets can be dangerous for the foot ?
My last question (for today ^^), it would be interesting to know how outsole is made ? and the differences between FG and SG studs ;)
Thanks for sharing us your work !
Here's some answer,
1. The cement is applied to the whole outsole. It is transparent sort of like rubber cement. You cant see it in the picture. The white part you see is the color of the molded plastic base. The outsole for the model shown in white with black studs, and the white part is the first injection base color.
2. The rivets do help reinforce the outsole assembly, and dont really have much effect on cost (each rivet is less than $0.01). How many rivets and the location are really up to the designer. If the rivets are correctly put in, the inside should be flat, so there should be no issue with anyything sharp or dangerous inside.
3. I'm actually working on a series about the mold making and injection outsole manufacture. Hope you can wait...its a little complicated to describe without pictures.
As well, Ill cover the difference between FG and SG studs too in an upcoming post.
In general, the idea is that SG studs are longer and the outsole has less studs (typically 6), to provide more grip. The less studs there are, the more weight of your body is on each to drive it into the ground for better traction on wet ground (SG means Soft Ground).
R
Thanks R ;)
The fact is on the picture i feel that the white part is not stuck to the black part... ?
Point 3., i don't know if i can wait..., ok i'll wait :D
Keep up the good work (blog and Hummel !), and thanks (again) for sharing ;)
A ^^
hi
I was wondering do they attach the sole to the leather of the boots in the same way, using those techniques, and why are those techniques used, what are the benefits?. Also does a fibreglass shank used of the sole, help the stability of the boot and what are the benefits of that as well.Thanks for your time.
how is the stud itself produced/manufactured
Post a Comment
<< Home